Twin Display Universal Toolmaker′s Microscope (JX13CS)
JX13CS Twin Displayers Universal Toolmaker's Feature The measuring software adopts twin displayers and touching LED scre
Basic Info.
| Model NO. | JX13CS |
| Usage | Industry measurement |
| Principle | Optics |
| Resolution | 0.0002mm |
| Gross magnification | 10X, 30X,50X |
| Objective magnification | 1X, 3X, 5X |
| Accuracy | (1+L/100) micrometer |
| Measurement Range (X*Y)mm | 200mm*100mm |
| Transport Package | Veneer Case |
| Specification | ISO9001: 2000 CE Certificate |
| Trademark | Sinpo |
| Origin | Guizhou, China |
| HS Code | 9011800090 |
| Production Capacity | 500 Units/Year |
Product Description
JX13CS Twin Displayers Universal Toolmaker'sFeature
The measuring software adopts twin displayers and touching LED screens, Data collecting can be finished by convenient one touching. Operation is very easy, Measuring is efficient.
Equipped with circle light and could controlled by zone control, the light is adjustable according to requirement during measurement.
Automatic recognition of workpiece contour, eliminate personal error, enhance operation efficiency.
Equipped with powerful image processing software, can accomplish complicated measuring task, and communication between data and CAD to realize measuring and mapping.
Add additional display function of local point magnification of workpiece image, increase pointing accuracy.
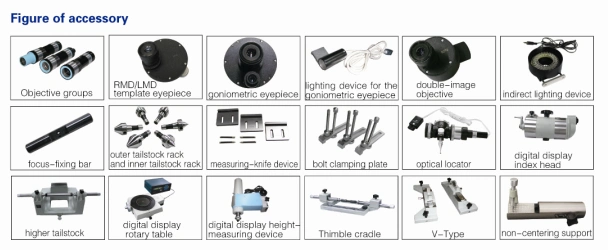
It equipped with Digital indexing table and height measuring device, digital display of angle and height.
Usage
JX13CS can measure the dimension, angle, shape, location and parameters of screw of different workpiece in high accuracy...
The typical measuring objects include:
1. Measure the diameter, length, angle and hole position of various kinds of metal machinery components, punching parts and plastic parts. Measure the shape of all kinds of molding parts such as sample or template, modeling tool, Template milling cutter, punching die and cam;
2. Measure geometrical parameter of various cutter, tooling, mold and gauge;
3. Measure the pitch of diameter, external diameter, internal diameter, pitch and thread angle of external thread (such as thread gauge, guide screw and worm).
4. Measure the helical pitch, gear form and jaw-shaped angle of the gear hobbler.
5. Measure the line width, distance and welding hole dimensions and locations of electrical units of printed circuit board.
6. Measure two dimensional tolerance of various parts.
Technical Parameter
Worktable
Measuring range of coordinate
X-coordinate: 200mm Y-coordinate: 100mm
Measuring resolution ratio: X- and Y- coordinate: 0.0002mm
Accuracy of the instrument: X- and Y- coordinate: (1+L/100)μ M, of which, L=measured length in mm
Square worktable dimension (mm): 260× 270
Square worktable allowable max height of loaded workpiece (mm): 140
Microscope upright column
Sloping scope: ± 12°
Calibrated value of the slope angle: 30
Objective
Objective magnification Object working distance (mm) Object visual field (mm)
1× 82 6.0× 4.0
3× 70 2.0× 1.5
5× 49 1.2× 0.9
Image range on screen (mm)
1/25.2× 4.1 1/34.1× 3.1
1/21.7× 1.4 1/31.4× 1.0
1/21.0× 0.8 1/30.8× 0.6
Tailstock rack:
Maximum clamping diameter: φ 100mm
Maximum clamping length: 700mm
Higher Tailstock rack:
Maximum clamping diameter: φ 250mm
Maximum clamping length: 200mm
Digital display dividing head:
Angle measuring range: 0° ~360°
Angle resolution ratio: 5
Angle measuring accuracy: 30
CCD automatic camera:
1/2or 1/3black and white (colorful) CCD
The number of pixels: 795× 596
Optical detector:
Minimum detective hole diameter of the optical detector: φ 5mm
Maximum detective depth of optical detector: 15mm
Measuring Force: 0.1N
Positioning stability: 0.001mm
Calibrated Limited error of measuring head: 0.0005mm
Maximum load: 40kg
Overall size of instrument: 1300× 1250× 800
Weight of instrument: 450kg
Measurement ambient requirements:
Room temperature: 20 centigrade± 1 centigrade, relative humidity: <60%
| Model | JX13CS | |
| X-coordinate(mm) | 200mm | |
| Y-coordinate(mm) | 100mm | |
| Resolution ration (mm) | X and Y coordinate:0.0002mm | |
| Accuracy | (1+L/100)μm | |
| Area of worktable | Square worktable(mm) 260×270 | |
| Max height of stored workpiece on square worktable | 140mm | |
| Microscope upright column | Sloping scope | ±12° |
| Calibrated value of slope angle | 30′ | |
| Digital display index head | Angle measuring range | 0°~360° |
| Resolution ratio of angle measuring | 5″ | |
| Accuracy of angle measuring | 30″ | |
| Tailstock rack | Max gripped diameter | φ100mm |
| Max gripped length | 700mm | |
| Higher Tailstock | Max gripped diameter | φ250mm |
| Max gripped length | 200mm | |
| Optical position indicator | Min detective aperture | φ5mm |
| Max detective depth | 15mm | |
| Metering force | 0.1N | |
| Locating stability | 0.001mm | |
| Limit error gauged for head diameter | 0.0005mm | |
| Objective magnification | 1X 3X 5X | |
| Object working distance (mm) | 82 70 49 | |
| Object visual field (mm) | 6.0×4.0 2.0×1.5 1.5×0.9 | |
| Screen image range (mm) | 1/2″≈5.2×4.1 1/2″≈1.7×1.4 1/2″≈1.0×0.8 | |
| CCD Specifications | 1/3″≈4.1×3.1 1/3″≈1.4×1.0 1/3″≈0.8×0.6 | |
| Overall sizes (mm) | 1300×1250×800 | |
| CCD camera head | 1/2″ or 1/3″ black & white (colored) CCD | |
| number of pixel | 795×596 | |
| Weight | 450kg | |
| Max load | 40kg | |


previous:
Digital Readout Toolmaker Microscope Stm
Send to us


